

B-SIM V2.5 Reference - Blow molding simulation

Example 3: Extrusion blow molding
Click here to see video (249 kB).
Back to Tutorial Previous Example Next Example
Creating tool representation
In this example there are two tools used. These tools are quite
complicated so there is no easy way to create them. CAD software (SurfCam,
SolidWorks, Catia, Pro-Engineer etc.) must be used. Once the tools are
created in CAD, their STL representation can be directly imported into
B-SIM.
Remark: STL files are not distributed with B-SIM. For simulation use directly files Box1.tol and Box2.tol.
Creating parison
In this example a simple parison is used with uniform thickness distribution.
To create the parison, click on New Grid
on B-SIM shortcuts bar. Create preform / parison
dialog appears.
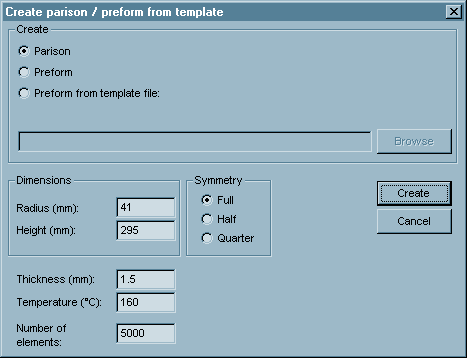
Fill in the dialog with values of radius, height, thickness, temperature
and number of elements. Click Create. The
following window with the new parison created appears on the screen:
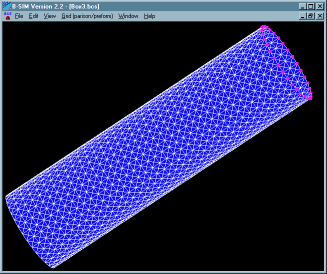
Now, because the tools used have their minimal z coordinate equal to
zero, the parison must be moved up to prevent sagged part of parison
to get out of the mold. To move the parison, click on Grid
/ Move and in Move dialog, specify z equal to 4 mm. Click OK.
Click File / Save and specify a filename
(Box.bcs, use "\Box3Ref" folder).
Process control
In this case the tools (parts of mold) squeeze the parison. Once
the tools are at the final positions, a pressure is applied to inflate
the squeezed parison. Click New Process Control
on B-SIM shortcuts bar. Fill in the table with the following time
and pressure / position values:
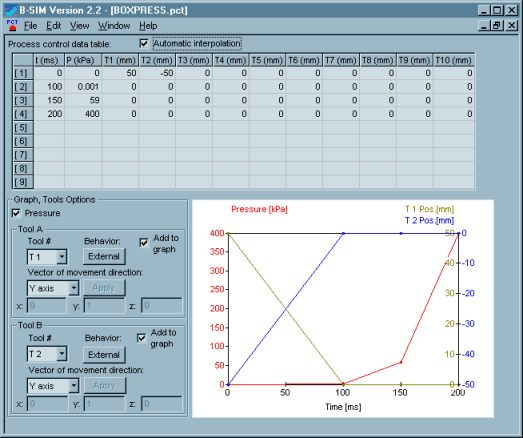
The tools in their files are located final positions (closed mold). For this reason, before the process starts, they are moved away so the mold is open. Both tools move along Y axis (don't forget to select the shift vector for both tool 1 and tool 2). Both tools behave as external. Click File / Save and specify a file name for the process control data (BoxPress.pct, use "\Box3Ref" folder).
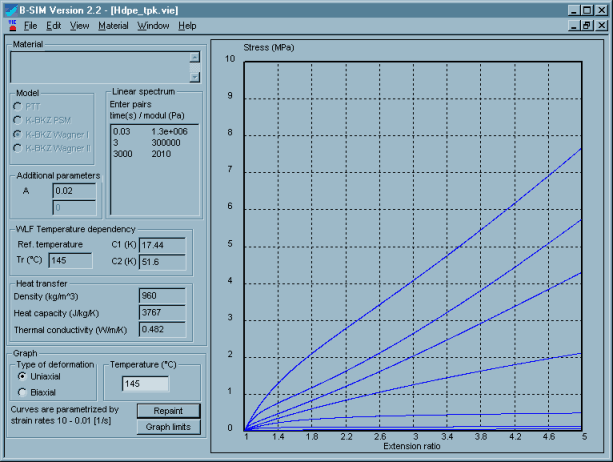
Material properties
HDPE is used in this example. Data of this material are stored in
the B-SIM material file HDPE_TPK.VIE:
Heat and friction
Click New Heat & friction on B-SIM
shortcuts bar. Fill in the dialog with the following values:
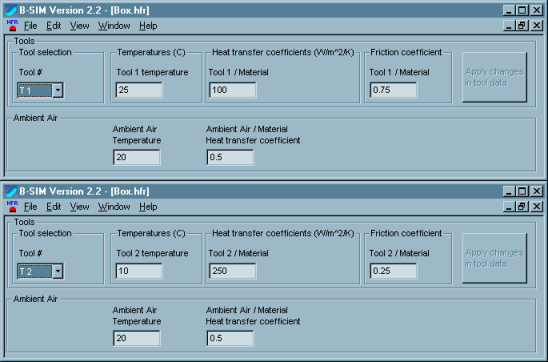
Click File / Save and specify a file name (Box.hfr).
Setting up a project
To set up a project click New Project on B-SIM shortcuts bar. Use Browse buttons to select:
| Grid | Box.bcs |
| Tool 1 | Box1.tol |
| Tool 2 | Box2.tol |
| Material | HDPE_TPK.vie |
| Process control | BoxPress.pct |
| Heat & friction | Box.hfr |
Specify more details about this project in Additional
information (optional). Click File /Save
to save the new project. Specify the project name (Box3.tff). When the
project is saved, click Project / Solve to
start the project simulation. Within short time the project is solved
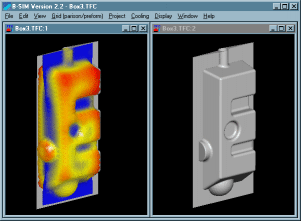
and you can view results in post processing - just click on Project
/ Open for post-processing. To learn more about post processing
please see Reference - Post processing.
Back to Tutorial Previous Example Next Example